
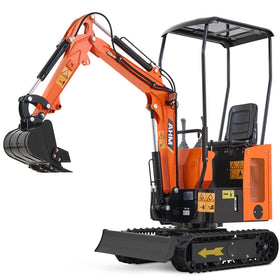
I've spent years working with mini excavators, and I can tell you the thumb attachment is the game-changer most operators wish they'd bought sooner. This simple add-on lets your excavator grab and move stuff instead of just digging.
Think of it like this - without a thumb, your excavator bucket is just a scoop. With a thumb, it becomes a claw that can grip logs, rocks, concrete chunks, and pretty much anything else you need to move around your job site.
What Is a Mini Excavator Thumb and Why You Need One

A mini excavator thumb is a claw attachment that works against your bucket. It mounts to your excavator's arm and gives you grabbing power that saves tons of time and backbreaking work.
I remember the first big clearing job I did after adding a thumb to my mini excavator. What would have taken my crew three days of manual loading took just one day because we could grab and place debris directly into our trailer.
Here's what a good thumb attachment lets you do:
-
Pick up rocks, logs, and debris without leaving your cab
-
Clear brush and small trees in half the time
-
Stack materials exactly where you want them
-
Handle demolition waste without extra laborers
Three Types of Mini Excavator Thumbs and Their Uses
After trying all three main types over the years, I've found each has its place depending on your budget and needs.
1. Fixed Thumbs
These are the basic, no-frills option that's permanently positioned at one angle:
-
Cheapest option at $300-600
-
No hydraulics needed
-
Simple bolt-on installation you can do yourself
-
Works fine for occasional use
The downside? You'll have to wiggle your bucket around to get the right grip angle. It works, but it can be frustrating on complex jobs.
2. Hydraulic Thumbs

This is what the pros use when they need precision:
-
Moves independently using its own hydraulic cylinder
-
Gives you complete control of grabbing angles
-
Handles odd-shaped materials easily
-
Makes quick work of sorting tasks
They cost more ($800-1500) and need hydraulic hookups, but the time you save makes them worth every penny for regular use.
3. Progressive Link Thumbs
This middle-ground option is what I recommend for most property owners:
-
Moves with your bucket's motion
-
No extra hydraulics needed
-
Better flexibility than fixed thumbs
-
More affordable than fully hydraulic models
How to Pick the Right Thumb for Your Mini Excavator
When I help friends choose thumbs for their machines, I tell them to consider these three things:
Will It Fit Your Machine?
Not all thumbs fit all excavators. Check:
-
Your excavator's make and model
-
The width of your stick (arm)
-
Your existing mounting points
-
Whether you have aux hydraulics (for hydraulic thumbs)
I learned this lesson the hard way when I ordered a thumb online without measuring first. The mounting holes didn't line up, and I spent a whole Saturday with a drill and welder making it fit.
How's the Build Quality?
The difference between a good thumb and a cheap one comes down to:
-
Thickness of the steel (⅜" minimum for durability)
-
Quality of the welds (look for full penetration welds)
-
Reinforced pivot points that won't wear out
-
Proper hardware grade (Grade 8 bolts are a must)
I've seen cheap thumbs bend on the first big job. Trust me, spending a bit more upfront saves money later.
What Will You Use It For Most?
Think about your typical jobs:
-
Clearing brush and small trees? Look for wider tines.
-
Moving rocks and boulders? You need stronger gripping power.
-
Demo work? Make sure it can handle the weight of concrete.
-
Precision placement? A hydraulic model gives better control.
Construction Equipment Magazine notes that "The type of thumb you choose should be based on the applications you encounter most frequently. While hydraulic thumbs offer the most versatility, progressive link and fixed thumbs can be cost-effective alternatives for specific use cases." (Construction Equipment Magazine)
Installing Your Mini Excavator Thumb
You've got two options here depending on the type you choose.
Setting Up a Fixed Thumb
Most people with basic tools can install a fixed thumb in an afternoon:
-
Line up the thumb where you want it on your stick
-
Mark and drill holes if needed
-
Bolt everything together tight
-
Test it with different bucket positions
-
Check and tighten bolts after a few hours of use
Setting Up a Hydraulic Thumb
This gets more complicated:
-
Mount the thumb mechanism first
-
Install the hydraulic cylinder
-
Run hydraulic lines to your existing system
-
Set proper pressure (usually 2500-3000 PSI)
-
Check for leaks before heavy use
My buddy Dave saved about $600 installing his own hydraulic thumb, but it took him a whole weekend plus some troubleshooting. If you're not comfortable with hydraulics, hiring a pro makes sense.
Best Uses for Your Mini Excavator Thumb
Adding a thumb completely changes what your mini ex can do.
Demolition Work
My demolition jobs got way easier with a thumb because I could:
-
Grab and stack wall sections instead of breaking them small
-
Pull out and sort rebar from concrete
-
Load trucks directly without extra handling
-
Separate materials as I worked
Land Clearing
This is where thumbs really shine:
-
Grab entire small trees and pull them out roots and all
-
Pick up brush piles and load them directly
-
Move rocks and stumps without getting off the machine
-
Stack logs neatly as you clear
Pipe and Utility Work
Thumbs make underground work smoother:
-
Place pipes exactly where you want them
-
Remove obstacles from your trench line
-
Handle delicate materials without damage
-
Place bedding materials with precision
Landscaping Projects
For property improvement, thumbs help with:
-
Placing large landscape rocks precisely
-
Handling awkward materials like timbers
-
Removing old plantings with root balls intact
-
Building retaining walls faster
Taking Care of Your Thumb Attachment
Keep your investment working right with basic maintenance:
-
Grease all moving parts weekly during heavy use
-
Check hydraulic connections for leaks regularly
-
Tighten all bolts after the first 10 hours of use
-
Look for cracks in welds before big jobs
-
Clean and oil cylinder rods when stored
OSHA's excavation safety guidelines highlight that "regular inspection and maintenance of excavator attachments is essential to prevent struck-by hazards caused by falling materials during lifting operations." This is particularly important for thumb attachments that secure and transport heavy objects. (OSHA)
Is a Thumb Worth the Money?
After using excavator thumbs for years, I can say without doubt they pay for themselves quickly:
-
You'll finish jobs 30-50% faster on material handling
-
You can work with fewer ground laborers
-
You'll take on jobs you couldn't handle before
-
Your back will thank you for not lifting heavy stuff
-
Your excavator becomes useful for way more tasks
As my contractor friend Mike puts it: "My thumb attachment turned my mini ex into three machines in one. It digs, it grabs, and it places - I can't imagine working without it now."
Tips for Getting the Most from Your Thumb

Once you've got your thumb installed, here's how to use it like a pro:
-
Practice on easy stuff first to get a feel for the grip
-
Position your machine at right angles to what you're grabbing
-
Use the thumb and bucket together for the strongest hold
-
Sort materials as you work to save cleanup time
-
Keep the thumb tucked in when not in use to avoid damage
If you run an excavator without a thumb, you're working twice as hard for half the results. Stop making your life harder than it needs to be. Get a thumb, learn to use it well, and you'll wonder how you ever worked without one. Your back, your schedule, and your wallet will all thank you.
Further Reading:
Top 5 Landscaping Ideas for Your Property


