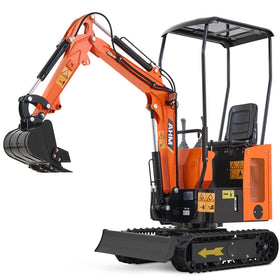
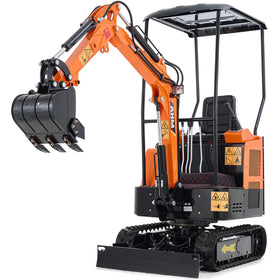
For complex yard leveling projects, the right equipment makes all the difference. While many contractors suggest skid steers for basic grading, yards with roots, rocks, and elevation changes demand more versatile solutions. Here's what you need to know about using a mini excavator to transform your uneven yard into a properly graded space.
What to Know Before Leveling Your Yard

Before starting any leveling project, you need to assess your yard's specific challenges. Most yards fall into one of these categories:
Standard Grade Correction: Your yard has general unevenness but no major obstacles. These projects typically require a grade change of 1-2 inches per 8 feet for proper drainage.
Complex Terrain Revision: Your property has significant elevation changes, requiring careful planning to create usable spaces while maintaining proper drainage. These projects often involve grade changes of 6-12 inches or more across the yard.
Obstacle-Rich Environment: Your yard contains multiple stumps, roots, or rocks that must be removed during the leveling process. These projects require both obstacle removal and precise grading skills.
Why Mini Excavators Are Your Best Choice for Tough Yards

When you're facing a yard riddled with established root systems and concealed boulders, the limitations of standard equipment become apparent quickly. The articulated arm of a mini excavator lets you reach, grab, and clear those obstacles while keeping your grading work intact. Think of it as having an extra set of hands that can pull out a stubborn root and smooth over the spot in one fluid motion.
This flexibility proves invaluable when working around existing landscaping or creating precise drainage slopes. A mini excavator's ability to work from multiple angles means you can maintain grade consistency while removing obstacles, something that's nearly impossible with straight-line equipment.
Essential Mini Excavator Attachments for Different Yard Challenges
Your success in yard leveling depends heavily on using the right mini excavator attachments for specific tasks. For most yard leveling projects, you'll need:
Grading Bucket: Choose a bucket width that matches your machine's track width for optimal stability and control. This gives you the best balance of efficiency and precision when establishing your final grade.
Tilt Bucket: Essential for creating drainage slopes and working on hillsides, a tilt bucket rotates up to 45 degrees for precise grade control. This attachment excels when you need to establish consistent slopes while working around existing features.
Root Rake: When dealing with heavily rooted areas, a root rake attachment helps separate roots from soil while preserving valuable topsoil for final grading.
Step-by-Step Guide to Leveling Your Yard
Creating a level yard requires a systematic approach that addresses both obvious and hidden challenges:
Start with Obstacle Removal: Begin by clearing any roots, rocks, or debris that could interfere with final grading. Work systematically across your yard, using your excavator's articulated arm to remove obstacles while minimizing disturbance to surrounding areas.
Establish Your Grade Lines: Set up reference points for your desired final grade, keeping in mind that proper drainage requires a 2% slope (1/4 inch drop per foot) away from structures. Use your excavator's boom length as a rough measuring tool – most standard booms are 8-10 feet long.
Work in Sections: Divide large yards into 20'x20' manageable areas. This approach helps maintain consistent grading and prevents the common mistake of creating uneven transitions between sections.
Check Your Progress: Regularly verify your grade with a laser level or string line. This extra step prevents the need for costly corrections later.

Common Yard Problems and How to Solve Them
Different soil conditions require different approaches to achieve optimal results:
Clay Soil:
Work when soil moisture is moderate – about as damp as a wrung-out sponge. Too wet, and you'll create ruts; too dry, and the soil becomes too hard to grade effectively.
When working with clay, a tilt bucket with smooth edges works best as it prevents soil from sticking and clumping. Start with shallow passes of about 2-3 inches deep to prevent the bucket from pulling up wet clay in chunks. If you encounter very hard, dry clay, you might need to score the surface in a crosshatch pattern with your standard bucket's teeth before attempting to grade. This breaks up the compacted surface without creating large clumps that would complicate final grading.
Sandy Soil:
Sandy soil's tendency to shift makes it tricky to grade effectively. Use a grading bucket with a flat edge and work in sections no larger than 15x15 feet. The key is to maintain consistent downward pressure – let the bucket's weight do the work rather than forcing it. When sandy soil is particularly loose, consider using your excavator's blade to create temporary berms around your work area. This prevents graded material from migrating during the finishing process. For best results, schedule your work early in the morning when natural dew provides just enough moisture for better material cohesion.
Rocky Terrain:
Rocky soil requires a systematic approach using multiple attachments.
Start with a heavy-duty toothed bucket to loosen and remove larger rocks – anything bigger than a softball should be pulled out individually. Position your mini excavator slightly above the work area when removing rocks, as this gives you better leverage and visibility. Switch to a sorting grapple attachment for removing medium-sized rocks while preserving as much soil as possible. This attachment allows you to literally "comb" through the soil, separating rocks while letting dirt fall through. For final grading, switch to a smooth-edge grading bucket, making sure to check your grade frequently as rocky soil tends to settle unevenly.
Keep excavated rocks sorted by size – larger specimens often work well for creating drainage swales or decorative features. Smaller rocks can be repurposed for drainage layers beneath topsoil in areas prone to pooling. When backfilling around removed rocks, compress the soil in layers to prevent future settling.
Conclusion

Effective yard leveling is as much about timing as technique. Monitor weather patterns closely – the best results come when soil moisture is optimal, typically a day or two after light rain. Pay attention to how water naturally moves across your property. Working with these natural drainage patterns rather than against them will save you countless hours of future corrections and ensure your yard remains properly graded through changing seasons.
When removing obstacles or adjusting grade, set aside quality topsoil for final grading. This not only ensures better grass establishment but also reduces the need for expensive imported soil. Consider creating designated soil storage areas at the start of your project, organizing materials by type for efficient reuse during final grading.
Most importantly, approach your yard leveling project with patience. A methodical, section-by-section approach might seem slower initially, but it prevents the costly mistakes that often come from rushing. Take time to check your grade frequently, using laser levels or string lines to verify your progress.


