
Mini Excavator Tracks Come Off: That's (Usually) Normal!
Tracks come off mini excavators, and it happens to everyone eventually - you hit a buried rock while turning, work on steep slopes, or just run with loose tension too long. One minute you're digging, the next you're staring at a derailed rubber track for a mini excavator wrapped halfway around the undercarriage.
Here's the good news: putting the track back on a mini excavator isn't complicated, and you definitely don't need to call a $200/hour technician for something you can handle in 20-30 minutes with basic tools.
The process of putting mini excavator tracks back on comes down to releasing track tension through a grease valve, positioning the track over the sprocket and rollers, then re-tensioning with a grease gun until you've got proper 1-2 inch sag in the middle. Here’s everything you need to know!

Why Mini Excavator Tracks Come Off: Common Causes
Mini excavator tracks derail for predictable reasons, and it is almost never because something's seriously broken. Usually, it is a relatively minor maintenance issue, not a breakdown. Rental companies report getting tracks back on in 15-25 minutes routinely.
Common causes:
- Improper tension (too loose or too tight)
- Debris between the track and the wheels
- Sharp turns on uneven terrain
- Worn sprocket teeth or damaged track links
- Steep slope operation with aggressive maneuvering
Putting Mini Excavator Tracks Back On: What to Do Before You Start
- Park on level ground - never attempt repairs on slopes
- Engage the pilot shutoff lever to lock hydraulic controls
- Keep bystanders 15+ feet away
- Wear steel-toe boots and work gloves
- Have a second person present when possible
If your track came off in mud or between structures, use the remaining track and bucket to "walk" the machine to flat, stable ground first.
Tools and Equipment You Need
Most mini excavators include these in their standard toolbox.
- Socket wrench set (19mm socket most common)
- Grease gun with hose attachment
- Fresh tube of grease (lithium EP2)
- Pry bars (2-3 feet in length)
- Cleaning rags
Most installations take 20-30 minutes with two people, and about 45 minutes working alone.

Step-by-Step: How to Put the Track Back On a Mini Excavator
There are six important steps involved in putting the tracks back on a mini excavator: release the track tension, then lift the machine slightly, position the track on the bottom rollers, work the track over the front idler, rotate the sprocket to pull the track on, and re-tension the tracks.
Here is a step-by-step guide on how to accomplish all six steps:
Step 1: Release the Track Tension
First, locate the access hole on the track frame's side with a removable cover plate and remove the cover bolts to expose the grease fitting inside. Use your 19mm socket to loosen the grease fitting counterclockwise. Some grease will spray out - this is normal.
Then, continue releasing until the flow stops. On newer machines, the idler wheel retracts as grease exits. On older excavators with debris, manually help the idler by pushing on the track.
Remove the fitting completely for maximum release, but make sure to keep it somewhere clean.
Step 2: Lift the Machine Slightly
Push the blade into the ground at the rear, lifting the back. Then extend the boom and bucket, pushing them into the ground to lift the entire excavator. The track should be 6-12 inches off the ground with noticeable slack.
Without a blade: Rotate the cab 90 degrees toward the working track, then push down with the bucket and boom at a 90-100 degree angle.
Step 3: Position the Track on the Bottom Rollers
With slack in the track, position it to rest on the rear drive sprocket and bottom carrier rollers. Lower the excavator slightly if needed - you want the track loose but the machine still elevated.
Step 4: Work the Track Over the Front Idler
Insert the pry bar between the track and the idler. Pull up on the bar while pushing the track toward the idler. Get just 6-8 inches of the track seated on the idler - you don't need perfect seating yet.
Step 5: Rotate the Sprocket to Pull the Track On
Slowly engage travel control to rotate the track forward. The sprocket rotation pulls the remaining track around rollers and completely seats it on the idler. Watch as it rotates - it should feed smoothly. The track will "carry itself" on within 2-3 rotations.
Step 6: Re-Tension the Tracks
Clean the grease fitting threads and reinstall by hand, then tighten with a socket wrench. Connect the grease gun and pump until the track sag measures 1-2 inches at the center bottom. Use the two-finger test - you should fit 2 fingers (roughly 1 inch) between the track and roller.
Replace the access cover and tighten bolts. Run the track forward and backward for 30 seconds to settle it, then recheck the sag.
How Tight Should Mini Excavator Tracks Be?
- Standard sag: 1-2 inches (25-50mm) at the center bottom
- Break-in period (first 30 hours): Check every 5-10 hours
- Two-finger test: Should fit 2 fingers under mid-track when elevated
Too loose tracks cause derailment during turns, while having them too tight wears sprockets and rollers, and increases fuel consumption. After tensioning, run the track forward and backward for 30 seconds, then recheck. New tracks stretch during break-in, requiring re-tensioning after the first few hours.

Why Your Mini Excavator Tracks Keep Coming Off
When your mini excavator tracks keep coming off, it is usually because of one or two persistent issues, usually associated with age, wear and tear, damage, or excessive debris. Any of the following problems could cause your excavator tracks to keep coming off:
- Worn sprocket teeth that skip over track lugs
- Damaged or missing track lugs
- Cracked rubber from UV exposure or rocky terrain
- Excessive debris buildup
- Track stretching from age
- Misaligned undercarriage from impact
Check sprocket condition every reinstallation. Worn sprockets with rounded teeth destroy new tracks and cause repeated derailments. Inspect tracks for cracks, missing lugs, or visible steel cording - these mean it's time for a replacement.
When to Call a Technician to Put Mini Excavator Tracks Back On
Professional service costs $150-300 for reinstallation, but you might need to get it when:
- Both tracks are completely derailed in difficult terrain
- Track shows visible steel cording or major tears
- The grease fitting is stripped or damaged
- Sprocket shows severe wear, needing replacement
- Track repeatedly derails after proper tensioning
- Working alone in a dangerous location
2 Mini Excavators with Durable Track Systems from AHM
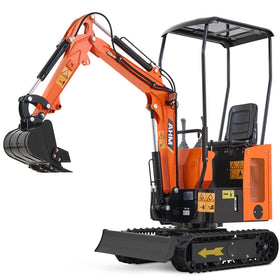
1. AHM AX-12B - $4,999.99
The AX-12B features an improved track frame design, reducing mud buildup and carrier roller wear.
- Weight: 2,138 pounds distributed across tracks
- Width: 37 inches
- Enhanced frame: Better debris management
- Reduced tail swing: Less track stress.
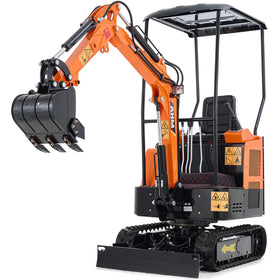
2. AHM AX-16 - $7,499.99
The AX-16 with 23 HP provides power for challenging terrain while maintaining track reliability.
- Power: 23 HP dual-cylinder
- Force: 3,262 lbf
- Width: 39 inches

The Bottom Line on Putting Tracks Back on a Mini Excavator
How to put a track back on a Mini excavator requires releasing grease tension through the access valve, lifting the machine with blade and bucket, positioning the track over the sprocket and rollers, working it onto the front idler with pry bars, rotating the sprocket to pull it fully on, then re-tensioning until you achieve 1-2 inch sag. The process takes 20-30 minutes with basic tools.
Track tension should measure 1-2 inches of sag when lifted, checked by fitting two fingers between the track and center roller. Tracks repeatedly coming off indicate worn sprockets, damaged links, or improper tension rather than serious problems. The AHM lineup features enhanced track frames, reducing mud buildup and wear across models, giving you that much-needed peace of mind.


